
Project Ideas Using ESP32 Without External Components
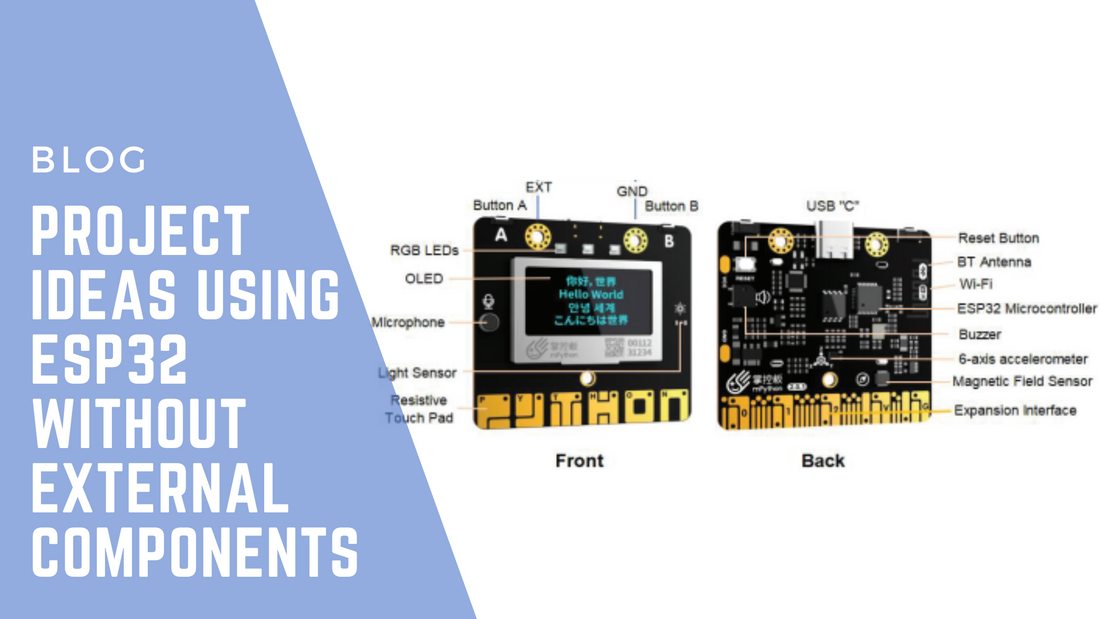
The mPythonBoard, powered by the versatile ESP32, offers an exciting range of in-built features that allow you to create innovative projects without the need for external components. With an array of sensors and interactive components like the microphone, RGB LED, A/B buttons, 6-axis accelerometer, OLED display, light sensor, magnetic field sensor, resistive touchpads, and Wi-Fi, you can build a wide variety of projects straight out of the box.
In this blog, we’ll explore several creative project ideas that you can implement using only the mPythonBoard’s built-in features. These projects are perfect for students, educators, and hobbyists who want to dive into coding and STEM projects without purchasing additional hardware.
1. Sound Meter Using the Built-in Microphone
The built-in microphone on the mPythonBoard can be used to measure sound levels in the environment. This project will turn the mPythonBoard into a basic sound meter, displaying real-time sound intensity on the OLED screen.
How It Works:
- Capture sound data using the built-in microphone.
- Display the sound level on the OLED screen, with bars representing the intensity.
- Optionally, set thresholds to trigger alerts (e.g., change the color of the RGB LED) when noise levels exceed a certain limit.
Applications:
- Measure noise levels in a classroom.
- Create a simple noise alert system for quiet zones.
2. Digital Spirit Level with the 6-axis Accelerometer
Turn your mPythonBoard into a digital spirit level using the built-in 6-axis accelerometer. This project utilizes the accelerometer to detect the board’s tilt in real time, displaying the angle on the OLED screen and providing visual feedback with the RGB LED.
How It Works:
- Use the accelerometer data to calculate the tilt of the board along the X and Y axes.
- Display the tilt angle or graphical representation on the OLED screen.
- Use the RGB LED to indicate when the board is perfectly level (e.g., green for level, red for tilted).
Applications:
- A useful tool for leveling surfaces during DIY projects.
- A fun way to learn about accelerometer data and its applications.
3. Motion-based Snake Game Using A/B Buttons and Accelerometer
Using only the A/B buttons and accelerometer, you can create a simple version of the classic Snake game on the mPythonBoard’s OLED screen. The snake can be controlled using tilts (accelerometer) for direction and the A/B buttons for speed or special moves.
How It Works:
- Display the snake game grid on the OLED screen.
- Use the accelerometer to control the snake’s movement based on tilt direction.
- Use the A and B buttons to change speed or perform actions like "boost" or "pause."
Applications:
- A fun game for learning how to handle inputs from buttons and accelerometer sensors.
- Great for showcasing basic game design concepts.
4. Automatic Brightness Control with Light Sensor
Use the light sensor on the mPythonBoard to create an automatic brightness control system. This project adjusts the brightness of the OLED screen and RGB LED based on ambient light levels, providing an adaptive display experience.
How It Works:
- Read the ambient light levels using the built-in light sensor.
- Adjust the brightness of the OLED screen and RGB LED based on the detected light intensity (dim in low light, bright in daylight).
- Display the light intensity values on the OLED screen.
Applications:
- Automatic screen brightness adjustment for improved visibility.
- Energy-saving projects for smart devices.
5. Compass Using the Magnetic Field Sensor
The mPythonBoard’s magnetic field sensor allows you to create a basic digital compass that detects the board’s orientation relative to the Earth’s magnetic field. This project will display the direction (N, S, E, W) on the OLED screen.
How It Works:
- Use the magnetic field sensor to measure the direction of the board.
- Display the corresponding compass direction on the OLED screen.
- Optionally, use the RGB LED to indicate cardinal directions (e.g., blue for north).
Applications:
- A simple digital compass for navigation.
- A project that teaches how magnetic fields can be used in technology.
6. Touch-Based Password Entry System
With the resistive touchpads on the mPythonBoard, you can design a password entry system that responds to a series of touch gestures. This project can be used to teach basic authentication systems or as an introduction to building interactive touch-based projects.
How It Works:
- Set a sequence of touchpad inputs as the "password."
- Detect touches and compare them to the predefined sequence.
- Display a success or failure message on the OLED screen.
Applications:
- A creative way to build a basic security or access control system.
- Learning project for touch sensors and interactive input systems.
7. Gesture-Controlled RGB LED with Resistive Touchpads
Control the color of the RGB LED using gestures on the resistive touchpads. For instance, swiping left or right across the touchpads could change the color or brightness of the LED.
How It Works:
- Assign different gestures (e.g., swipe, tap) to control the RGB LED’s color or brightness.
- Display feedback on the OLED screen indicating the current color or brightness level.
- Use the touchpads to switch between colors like red, blue, and green.
Applications:
- Fun, interactive way to learn about touch-based inputs.
- Build more complex gesture-based control systems.
8. Wi-Fi Signal Strength Monitor
With the built-in Wi-Fi, you can create a Wi-Fi signal strength monitor that displays the current signal strength on the OLED screen. This project uses the ESP32’s Wi-Fi module to scan for available networks and measure signal strength in real time.
How It Works:
- Use the Wi-Fi module to scan available networks.
- Display the list of networks along with their signal strengths (in dBm) on the OLED screen.
- Optionally, indicate strong and weak signals using the RGB LED (e.g., green for strong, red for weak).
Applications:
- A handy tool for checking Wi-Fi signal strength in different areas of your home or office.
- Learn more about how Wi-Fi communication works and how to measure network signals.
9. Clap-Based LED Control with Built-in Microphone
Using the microphone, you can create a clap-based control system for the RGB LED. In this project, the LED will turn on or off when a clap is detected by the microphone.
How It Works:
- Use the built-in microphone to detect claps (or loud sounds).
- Toggle the RGB LED on or off based on sound detection.
- Display a message on the OLED screen indicating the
current state (e.g., "LED On" or "LED Off") based on clap detection.
Applications:
- A fun way to control devices using sound-based inputs.
- An introductory project to sound recognition and smart control systems.
10. Pedometer Using the 6-Axis Accelerometer
The 6-axis accelerometer on the mPythonBoard can be used to create a simple pedometer that counts steps. This project tracks the user's motion and displays the step count on the OLED screen.
How It Works:
- Use the accelerometer data to detect walking motion and count steps.
- Display the current step count on the OLED screen.
- Optionally, use the RGB LED to give feedback based on step goals (e.g., green for reaching the goal).
Applications:
- A practical fitness tracker project that promotes physical activity.
- A simple introduction to accelerometer data processing and step counting algorithms.
Conclusion: Unleash Your Creativity with mPythonBoard's Built-In Features
The mPythonBoard is packed with powerful built-in components that allow you to create a wide variety of innovative projects without needing any external hardware. From motion-based games to real-world monitoring systems, you can explore countless possibilities using just the microphone, accelerometer, light sensor, magnetic field sensor, touchpads, OLED display, and more.
Ready to dive deeper? Check out our Ultimate Guide to Teaching ESP32 in K-12 Classrooms to get started with even more exciting projects. You can also explore ESP32 Projects for STEM Education to find out how to implement these ideas in the classroom.
1 comment
Great ideas!! Will implement in one of my STEM club sessions.